We love nail art designs but they can be tricky. Not everyone can be a pro at this art. Do you mess up every time you try out a nail art design? We decided to list out few designs that are too easy to mess up with. These are for all the beginners who are trying too hard to get that perfect nail art done. In fact, these designs are not only easy but will look very interesting and offbeat.
These designs will require you dotted tools and manicure tapes. If you don’t have these, you can use substitutes like toothpicks, ball point pen instead of a dotted tool and cello tape instead of a manicure tape.
Let’s get started!
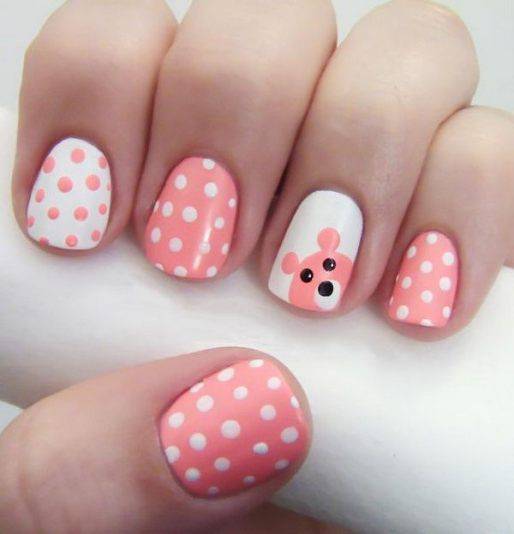
This cute nail design requires a dotted tool and a combination of nail paints. You can choose any color combination that you like. Apply the first color on your nails and after it dries up create polka dots at a regular distance with the help of a dotted tool. The teddy in the ring finger appear tricky? Well, it is not! Make a large size dot at the corner of the nail and add two small dots to create ears. Wait till it dries and then create small dots over the large dot to finish eyes and nose.

This design is easy and colorful. If you don’t want to try regular french manicure you can always go for this design. Choose a base color of your choice and let it dry. Once dried, create a dotted lining at the top with the help of a small dotting tool.

Here is a design that is fun and doesn’t require to be neat. You can choose as many colors as you want, and can use whichever color combination you like. The very first step is to apply the main color on all your fingers. After it dries, take any color of your choice and do a free hand manicure design and mess it up like it has been shown in the picture. Use different colors of manicure for all fingers to make the design look more vibrant
?
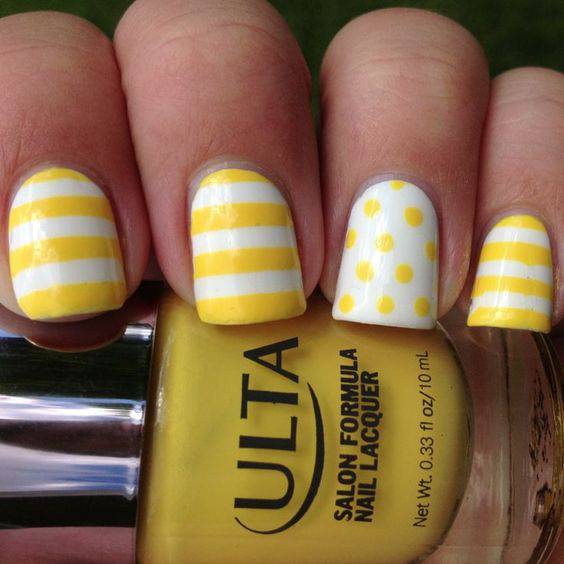
This nail art design will require dotted tool as well as manicure strip. It is a trendy mix match of polka dots and stripes and requires the least amount of effort. You know how to create polka dots. Stripes are even easier. Let the first color dry, after it does, stick your manicure strips horizontally at regular distance. Apply the second nail color on the remaining area and take off the manicure strips once the second color dries out. You can also experiment with vertical stripes.
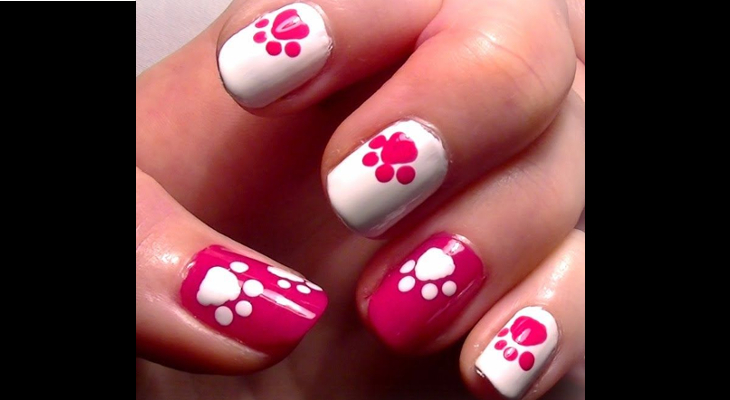
The tiny paw prints look delightful as nail art design. Create a large dot with a free hand, as it doesn’t have to be perfect. Create four small dots around the large dot with the help of dotted and your paw print is ready. It is easy and worth the try.
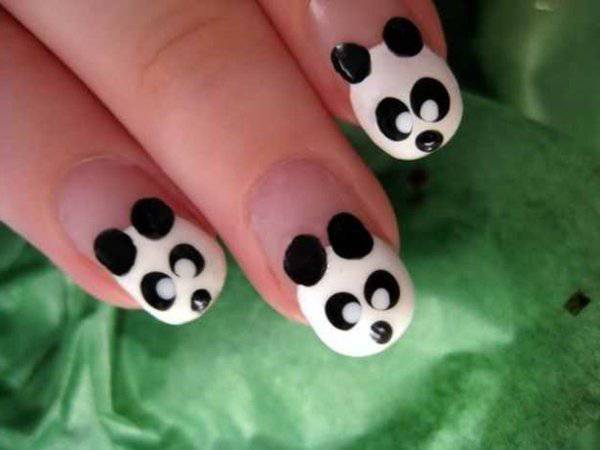
This design is not only easy but it is our personal favorite nail art design so you have to give it a try. This Panda nail art looks adorable and wholesome. You will need white and black nail color and different size dotted tools. You don’t have to completely fill your nails, just apply white nail color on the above half of your nails as shown in the picture. Let it dry. Now bring your dotted tools to work and create eyes, ears and nose with black color. After the black color dries, use a small dotted tool and create white dots inside the black dots to complete the eyes. Try it and give an instant high to your cuteness quotient.
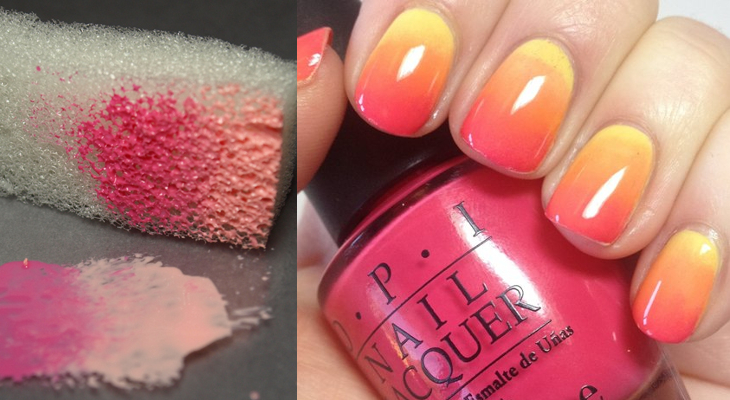
The ombre effect looks elegant and pretty. To create this design you will need a combination of nail colors. We would suggest you to go for two colors in the beginning. You will need a small piece of sponge to create this effect. Apply your base coat and let it dry. Apply the two colors of your choice on the sponge. Do not mix the colors, apply them next to each other as shown in the picture above. Press the sponge against your nails and repeat the process at least twice or until the desirable result is produced.
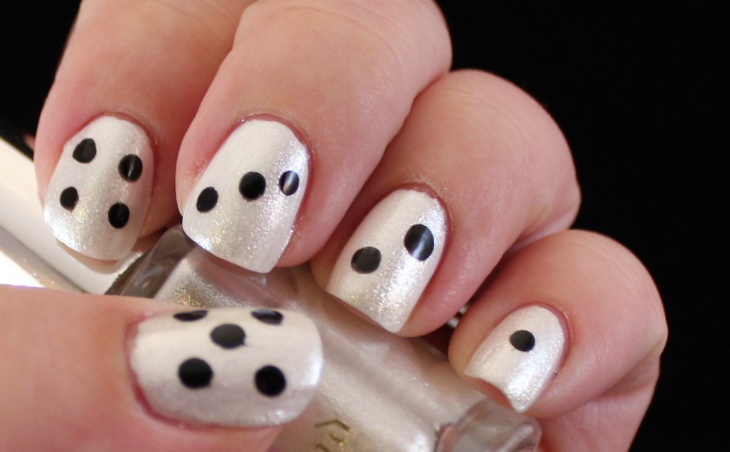
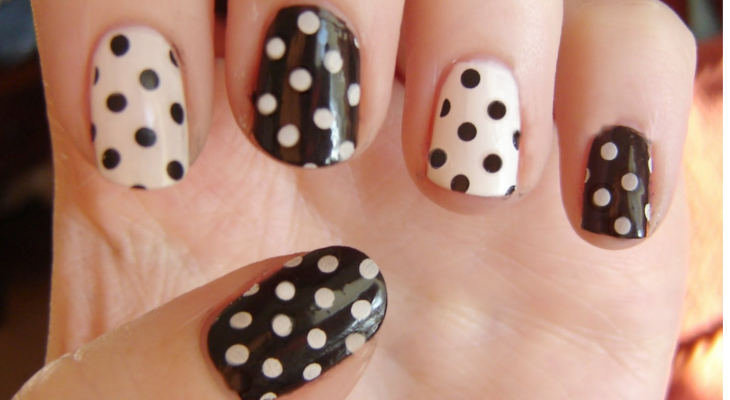
Let make things dicey ! Well, not really. This is a super easy design and by now, after going through the methods discussed above, you might have figured out how to create this Dice nail art design. Ideally, you should be using white and black colors for this design but you can experiment with different color dots.
These are some easy nail art designs that will not take much time and effort. We hope these designs help you come up with more easy designs of your own. Remember to apply a base coat before applying the nail colors to protect your nails. Always seal you nail design with a transparent top coat for a clean finish and longevity.
Related Posts
Gucci Collections for 2023
Fashion Trends Pre-Fall 2023
Upcoming Fashion Trends 2023!
Trend Alert! Hairstyles for Men 2023
Best Hair Color Trends for 2023
Beauty Trends to Try in 2023
Biggest Denim Trends of 2023
Fashion Accessory Trends for 2023
Best Red Carpet Looks Golden Globes, 2023
10 Best Dressed Men Golden Globes, 2023
Best Beauty Looks Golden Globes, 2023
Versace’s Fall Winter 2023 Collection
Best Dressed Celebs People’s Choice Awards 2023
Spring 2023 Fashion Trends
2023 Fall Winter Fashion Trends